week 1
UNITY
Importing Assets, Materials, Lighting, Camera

Today's lecture, we have learned how to import assets.
There are two ways of import assets:
1. Click on "Assets/Import New Asset".
2. Drag and drop the file from the Project window.
To create that little city, what my pictures present, I duplicate one building (Control + D).


The picture below presents how I added materials on buildings.
I selected "Create/Material" in the Project view. In the inspector view, I clicked on Albedo colour, and I picked a colour (brown, grey and green). For each colour, I had to create a new material. To put a colour on buildings, I dragged and dropped each material onto objects in the scene view.

Pictures below show how I was playing with light.
I discovered while I change the rotation of "Directional light" the shadows change same as day and night.


Terrain
To create a terrain I selected "GameObject/3D Object/Terrain," and it pops out on the scene. To work with Terrain, I had to choose it in the Scene or hierarchy window once its selected the options show in Inspector window.
To create high on the terrain, I used "Rise/Lower Terrain" settings.
To flatten the area I selected "Flatten".


To paint textures on the terrain, first I had to add some textures in "Edit Textures" than "Add Terrain Texture."
I added few different textures and using a brush I painted it on the terrain.
week 2
Prefabs, snapping, materials
Today I created a rubic cube. Based on ready material (rubic cube colours) I made a cube and applied the content on it. To make a rubic cube I duplicate my main cube three times. I used "snapping" to make the same gaps between the cubes. I parented all the cubes. I made it as a prefab. Later on, I created many rubic cubes (picture below). When I Edit the prefab, the changes applied to all of them. However, when I return back to the scene and then I edit a Prefab separately, only that one was affected.


Rubic cube ready colours.


Skybox
First of all, I clicked on the camera, and I selected Skybox. Skybox appears in the game window. In this task, I had to create my skybox.
I created a new material; I changed Shader to Skybox/Procedural I adjusted paraments to get effects which I liked. To assign this skybox to the camera, I clicked on Lighting/Settings, and I added my material to the skybox material.
To create a 360 image I would have to change Shader to Skybox/Panoramic and add a 360 imagine in the material.
The pictures on the left are also skybox materials. I changed Shader to Skybox/6 Sided. I imported six imagines from the orbital skybox folder, handed to us as a part of the task. In Inspector window I placed pictures to receive a wanted effect.
week 3
Materials
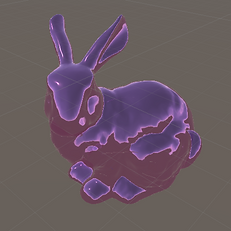
Today's task was to create different materials. First of all, I imported the bunny to my project scene. I created material, and I add it to the bunny. The picture on the right shows how I did that. Depends on smoothness and metallic. I created several materials (picture below).
The last picture of the bunny presents glass texture. In Rendering Mode I selected Transparent, Albedo alpha to zero and Metallic and Smoothness properties so that they match. In the end, I added a glass texture to the normal map property.


UNGLAZED CERAMIC GLAZED CERAMIC

MIDDLE GLAZED CERAMIC GLASS


Particles

To add a Particle System I selected GameObject/Effects/Particle System. I created a basic particle system (picture on the left). Later on I was playing with options such as: duration, looping, start speed, colour, rotation and size. Pictures below show the way I was expanding.


Fire
Here is the process how I made fire. The picture on the right shows all the settings and results it the picture below.


week 4
Particles System

On today's lecture, we imported a package from the Unity Store and took a closer look at how the particle system is made. To do that I clicked on Window/Asset Store then I downloaded "Unity Particle Pack" and I clicked on Download/import option to bring the package.
The picture on the left presents one of the particle systems. I made a little change to the colour as originally it was blue.
Mesh shape particles

My first action was to import a bunny to my project scene. I added a Particle System. In Shape module, I changed its shape to Mesh, and I added the bunny mesh into the mesh property. In Particle System settings I changed Start Speed to 0 and Start Size to 0.1, and I set Rate of emission to 500. The middle picture below shows the results I received. My next step was to add material for the particles. I set its shader to "Particles/Standard Unlit," Rendering mode to Fade, Color Mode to Additive and Albedo to bokeh texture. In Render Module, set the material to particle material. In Start Size I clicked on the arrow icon and selected "Random Between Two Constants". I set it to 0.7 and 0.1, Duration and Start Lifetime to 2 and Gravity Multiplier to -0.01. I added colour, and in Particle System I tick Align To Direction. The last picture is the final effect of my task.


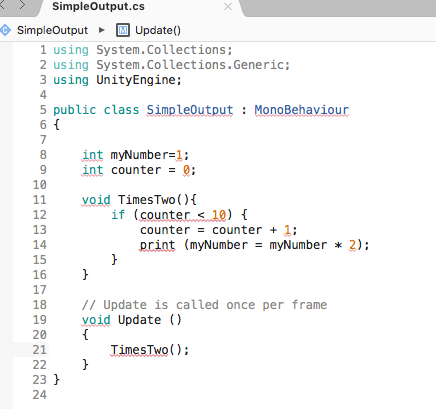
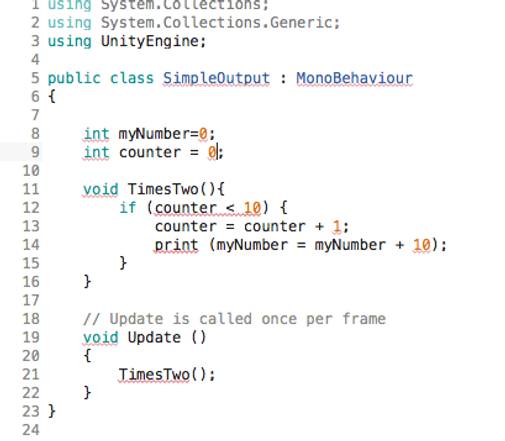
Scripting basics

I created a new project and I added a cube to the scene. To add a script in the project window I selected Create/C# Script. I select the cube in the scene window and drag and drop the script on to the cube. It appears as a new component. To open the script I double clicked on it. Pictures on the right and below present how I added "myName" and "mySurname" to a script.


I created a new project and I imported the asset (sprite). I set the project to 2D mode. I placed sprite in the middle of the scene. I clicked on the sprite and added a new script.
week 6
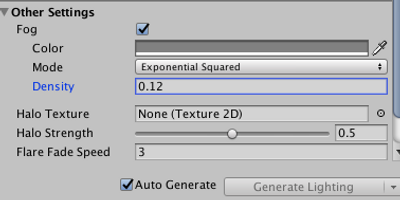
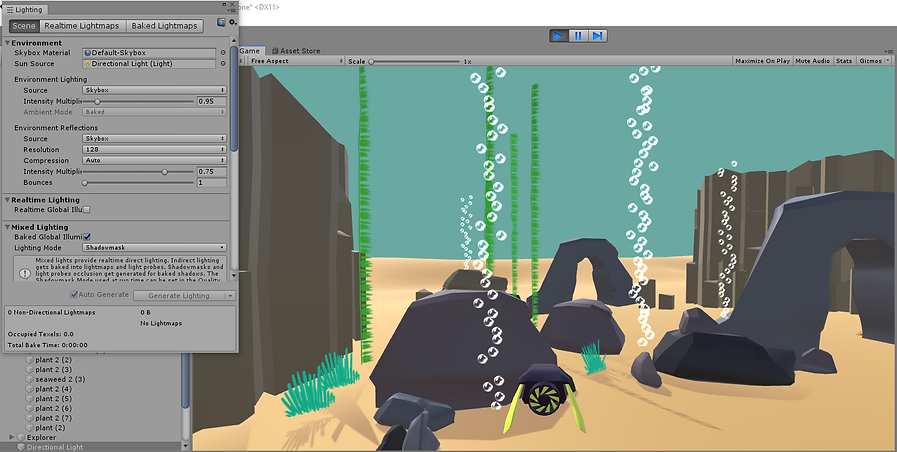
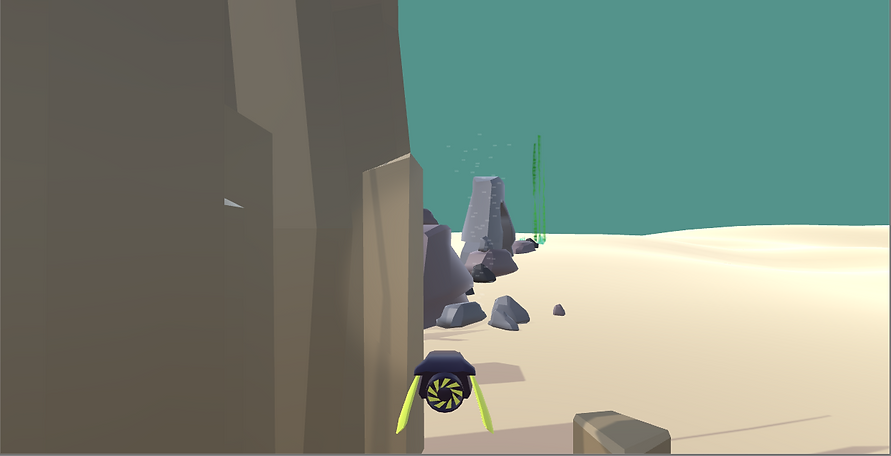
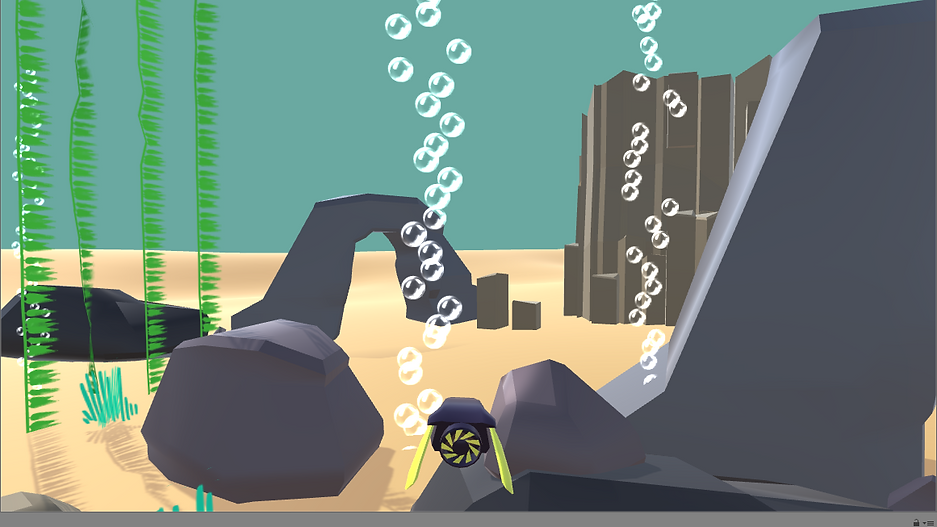
Test: Underwater Environment
Requirements:
• Scene arrangement
• Good use of Fog
• Good use of lighting
• Good use of shadows
• Good use of materials
• Good use of textures
• Good use of Particles
• Post Processing
• Overall presentation


week 8
Matte sorting

I set the aspect ratio to 16:9. I imported the art assets to the project. I added all the sprites to the scene and organized them. To change the sorting order od a sprite, I changed its index value (large number go in front).
y sorting (0,1,0)


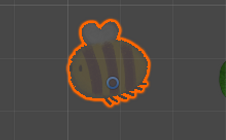
First of all, I imported assets to Unity (bee and bush). I placed the bee prefab and bushes on to the stage. The task was to make the bee appear in front of or behind the bushes. In this task, I sorted the sprites based on the Y axis (0,1,0).
The first step was in Project Settings/Graphics set it to Custom Axis and then set the sorting axis to (0,1,0).
Masking


I added a bee and two bushes to the scene. I selected the bee, I added a new Component - Sprite Mask, and then I added bee sprite into the Mask sprite. In the bee settings window, I turned off the sprite Renderer.
I selected one of the bushes and I set its property to Visible Inside Mask. I clicked on the second bush and I set it to Visible Outside Mask.
Camera and Chroma Keying

The picture on the left presents not rendered the background. To do that I clicked on Camera and select Don't Clear. I ran the project and moved the camera; the background did not clear the previous frame.


I created a 3D scene with a few cubes. I set Clear Flags to Solid Color, and I gave it a yellow colour.
I set the Main Camera's background to Solid Color and I changed the colour to purple. I set its Width of the Viewport Rect to 0.5. The next step, I duplicated the Main Camera, changed its background to black and set the X position of the Viewport Rect to 0 .5. The picture on the left is the outcome of this task. The split screen renders of two cameras.


week 9
Creating shaders
I added a new shader to my project and I selected Unlit Graph. I double clicked on the icon to open Shader Editor.


Basic node manipulation

I created a new project using Lightweight PR. I added a cube into a scene. I created a new material and I called it mat. I created a new PBR Graph and name it Shader.
I created a new Color Node and I attached it to the Albedo property. I saved this action by pressing Save Asset.


In shader editor, I right clicked on the color window and I converted it to property. Now the property appeared in property window (as shown on the picture above). Now I can change the colour of the cube from the inspector.
Mixing colours
I added a Stanford bunny into the scene, I created a new material and PBR Graph. I named it Shader and opened it in the Editor. I created two color nodes and convert them to properties - Color1 and Color2.


I added an Add node and pass two values into it and then pass the outcome into the Albedo channel. I saved the shader by pressing Save Asset button.
I applied the material to the bunny.

Add


Multiply

I removed the Add node, add multiple node and saved changes.
I deleted Multiplication and create a Lerp node (Linear Interpolation). I added a slider, connected it to Lerp node and made it as a property. I rename it to Transition.
Lerp


Position and Split


I added Position node and Split node.
Texturing

I created a new project using the Lightweight Rendering Pipeline and I added a grass asset. My next step was to create new material and PBR Graph. I named it GrassShader. I added two nodes: Texture 2D Asset and Sample Texture 2D.


I converted the Texture 2D Asset into property and rename it to Grass Texture. I saved changes.

In the material, I changed Shader to Shader Graphs/GrassShader and added the grass texture.
Grass model appeared only from one side and the texture does not appear as transparent. To change that I went to Shader Editor, I passed the A channel into the Alpha channel and click on the cog icon to change the surface type to Transparent.


The next step was to add colour. I opened Shader Editor again. I added a Color node and Multiply node. I converted the Color node into the property. I multiply the texture output by color and pass it into the albedo channel.
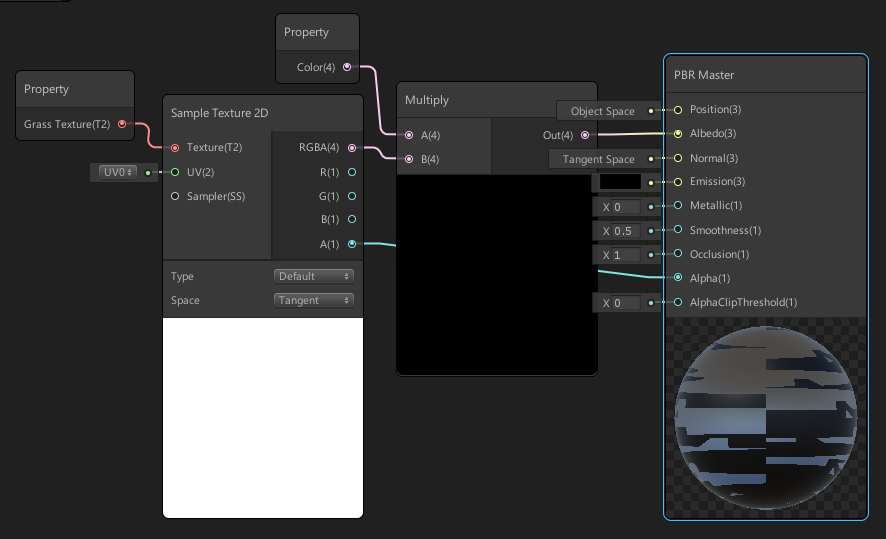

I added two more nodes: Multiply and Slider. I converted Slider into a property and named it Emission. I multiply the color of the texture by the emission property and I passed it into the Emission channel.


Animating texture

In Shader Editor I added a UV node and two more nodes: Split and Combine. This step is needed to interact with each component individually. I added Time and Add nodes. I passed Time into the U channel so that the texture scrolls along the X-axis.

Back in Shader Editor, I passed a Sine Time function instead of Time. I added a Multiply node and multiply the Time node by 0.2. I added another UV node, Slider and Lerp.
Next step was to add One Minus node. This can be used to invert the values.
Finally, I added a Slider node, converted it into a property and called it Wind Strength.
I passed it into time multiplication node. That allowed me to change wind strength in the shader.


week 10
Phong Shader


Toon/Cell shader


Fresnel Shader


Vertex Position Shader


Normal Map Shader


Vertex Displacement Shader


week 11
MipMapping
I created a plane and I changed its scale to 30,30,30. The next step I create a new material with checkers texture. I applied it to the plane. I changed the tiling of the texture to 5x5.


Texture Resolution

I imported the fern image and texture. I added a new material “fern”. I changed rendering mode to Fade, applied the fern texture to the Albedo and change colour to green.

Light Baking & Static Batching


week 12
LOD (level of detail)


week 13
Unity – Basic Programming in C# Part 1 - Variables and functions


Maze

I dragged and dropped stone sprite to the scene. I added 2D Collider (green frame around the sprite). To add Collider I clicked on Add Component/Physics2D/Box Collider 2D.

I created a box room 6x6. Next step I added the player object to the scene and I Added 2D Collider as well. I added Rigifbody 2D to the player object.


I created C# Script component and I name it "Movement".
The picture below present a script for the movement.


I removed one of the stones (part of the wall) and placed a door in its place. Then I added a Box Collider 2D.
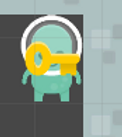
I also added a key object. I added a Circle Collider 2D to the key object and I changed its size to x = 0.40 and I clicked on is Trigger. Next step I added Rigidbody 2D to the key and selected is Kinematic.

I created a KeyObject Script and I added it to the key.
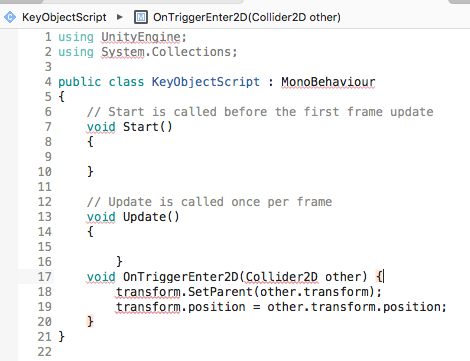


I was able to pick up the key and when I walked next to the wall the key place itself into the wall.

The key gets parented to the player, and then it gets parented to the wall. The script does not check for the type of an object. To improve that I had to click on the player object in the scene and change its tag to "Player". Next step I changed the script (picture on the left).
Now key stays with the player.
I created Door Script and I attached it to the door.

I opened the “Movement” Script and added KeyIsCollected variable. Now in the “KeyObject” Script, I set keyIsCollected to true, by accessing player’s “Movement” component. Finally, in the “Door” Script, check for keyIsCollected is true.


I created "UI_Key" script and I added it to the UI key element.


