


Photoshop work.
I had a vision of Stonehenge surrounded by dark sky. The first picture presents it on a beautiful blue sky to change that I have used second pictures (dark sky). I copied picture one to the layer of picture two. I selected Stonehenge and bottom part of picture one. Then I clicked on select and inverse. I deleted the blue sky from the first picture. I swap blue sky into dark sky from the second picture. At the end I changed the format of the picture, using option export, from Photoshop format (PSD) to PNG.
hybrid animals


The video shows how I placed a fox head on a bunny's body.
On the pictures below I have changed a little bit an original color of the picture to make it looks more real.


GREEN BACKGROUND
At the very beginning, I copied the women on the green background and I added her to the layer where I had a picture of the sky. I started from separating women from the original green background. I clicked option select then colour range. I picked all the green back ground (with darker bits on the bottom of the picture) then I inverted that. I clicked an options mask. The woman appeared on the blue sky. Around the woman, I had little green lines. In an action to remove it, I clicked on the main picture then imagine, adjustment, hue/saturation. I clicked an option-click and drag (image options) to modify Saturation. Green lines disappeared.
fake news


I used the picture of my hand and my cat (Richard) to create fake news in Photoshop. I placed the cat on my hand. To make it looks more real and fake at the same time, I minimized its size. I selected the cat and placed it on my hand. To make the fake news looking more realistic I created a shadow behind the cat. To do this, I selected my cat again. I copied and pasted to its layer. I made a copy of (Ctrl + J). I clicked on the original layer to make it active. In the next step, I transform the cat creature into his shadow (Ctrl + T). I locked transparent pixels, opened gradient tool I select the third box. I clicked back on lock transparent pixels. In the layers options, I changed it from normal to multiply. My next step was filter -> blur -> gaussian blur -> 3 pixels. I clicked on the marquee tool and selected the top part of the shadow. I refined the edge (feather 100 pixels). I moved to the gaussian blur option again and changed it to 20 pixels. I removed selection (Ctrl + D). I changed the opacity to 80%.


There are few more of my fake news.
I used the same techniques as I described above.

week 3
MAYA
basic house project
That was the first time when I worked in MAYA. I used some simple shapes of Polygons to create a basic model of the modern house.
James Bond gadget


My first project in MAYA.
It is a combination of a spinning top with a weapon on the top and a propeller.
To create a main shape of the spinning top, I used Curves/Surfaces - Bezier Curve Tool. After I made a side of the way of the object, I used the option Revolve.
Next, I created the propellers. I design one of the propel out of a Polygon Cylinder and shape it using a Soft Selection. I duplicate it five times.


Maya Arnold


New York Roof


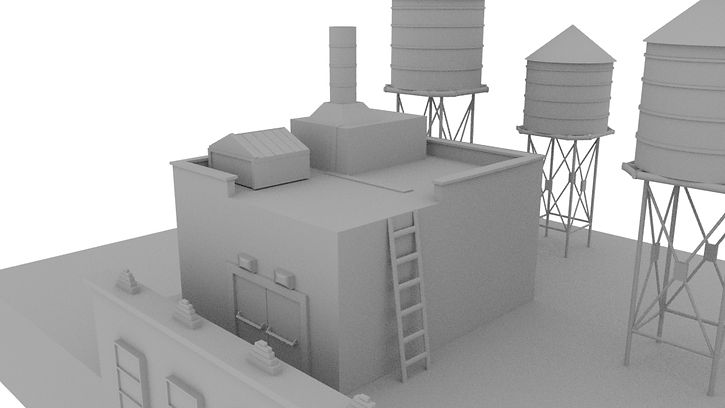


Final renders


Amsterdam (Fishing Port)


Final renders


